Sending a Receipt
Receipt senders are merchants (E-commerce websites, online booking tools, hotel chains, airlines, etc.) who wish to pass receipts through to their customers.
Getting Started
Before you can send your first receipt, you’ll need to create an account on Versa.
Then, as you make sales, you’ll check if the customers you’re selling to are registered to receive receipts. When Versa returns a positive customer match, you’ll send them the itemized receipt object. Only customers who have explicitly authorized access will receive receipts.
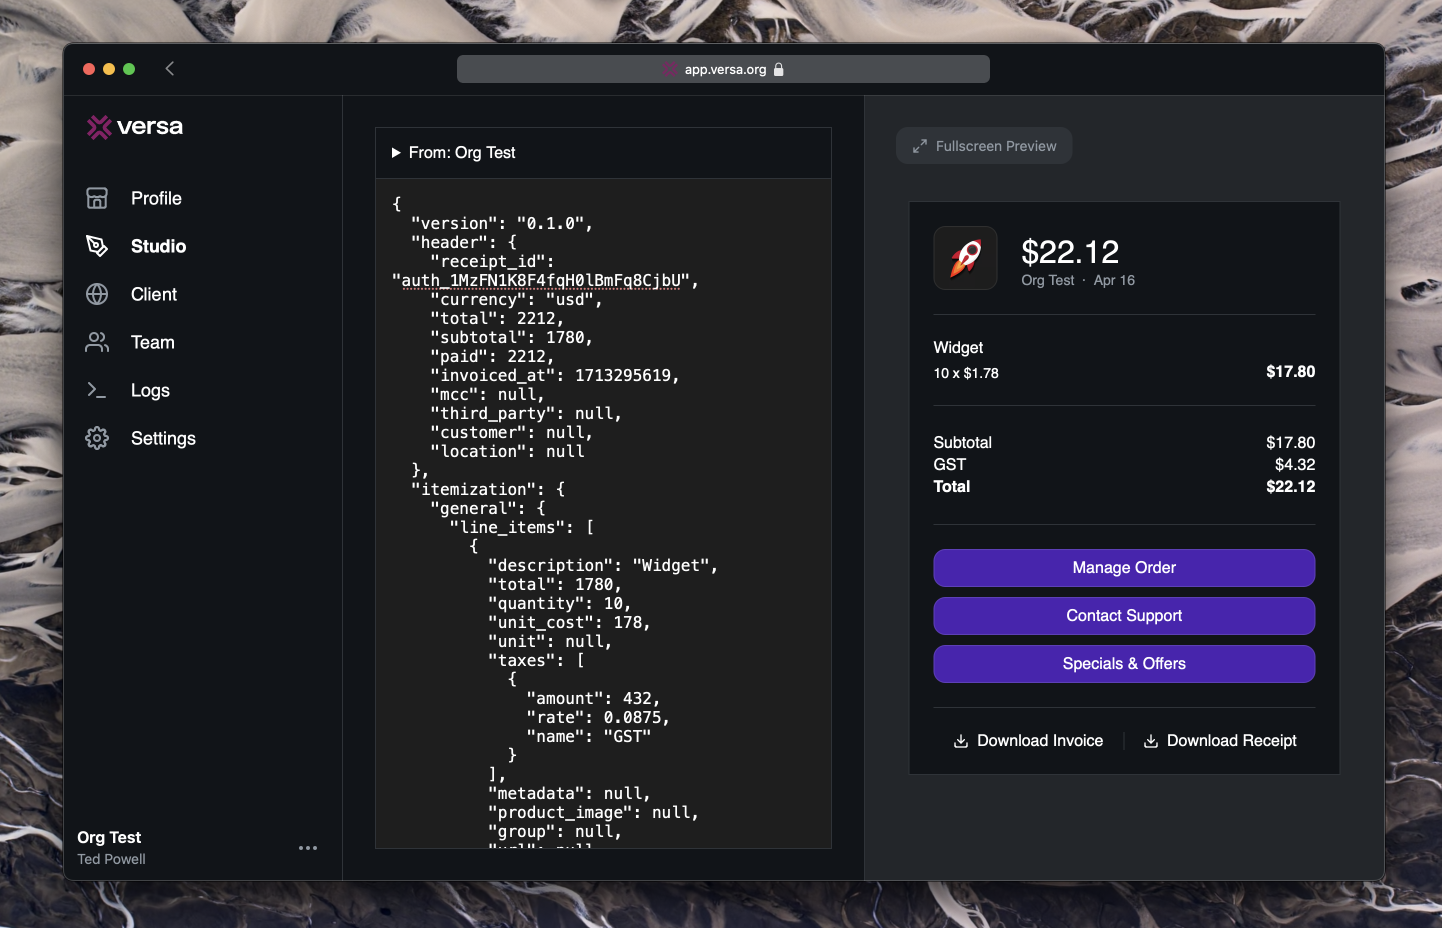
The receipt object itself must conform to Versa’s Versa Schema. The schema offers a range of formatting options, supporting the representation of different types of goods and services, from physical goods, to ground transportation, to subscriptions, etc. Configure your merchant name, logo, and brand color on the profile settings screen, and then prototype and preview your full, branded receipts in the studio.
Sending Receipts
When you’re ready to send receipts, there are two configuration options to pick from:
- Via a custodial configuration: With this arrangement, sending a receipt is as simple as a standard HTTP
POSTrequest. You make a single call per receipt, passing up the receipt JSON to Versa. Versa then handles the delivery of the data to matching authorized receivers. - Via a self-hosted configuration: With this arrangement, you don’t send Versa the raw receipt data to be distributed. Instead, you check Versa for registered customers, and when Versa returns matches, you manage the encryption and peer-to-peer receipt transfer directly.
The custodial configuration is typically a faster implementation; the self-hosted configuration gives you more control. At any point you can 'eject' from a custodial to a self-hosted configuration. Most developers start with a custodial configuration during development.
Custodial Configuration
Create your client in the Versa web app, and select that you are a 'Sender' and that you’d like to enable the 'Custodial' mode. Then copy your Client Secret and save it somewhere safe.
You’re now ready to send your first receipt. Add your CLIENT_ID, CLIENT_SECRET, a customer 'handle' (e.g. your customer’s work email address), and a Versa receipt object.
curl --request POST \
  --url 'https://custodial.versa.org/events' \
  --header 'Authorization: Basic CLIENT_ID:CLIENT_SECRET' \
  --header 'Content-Type: application/json' \
  --data '{
    "handles": {
      "customer_email": "jshmoe@sandbox-firehose.versa.org"
    },
    "data": { ... }
  }'
See the Events API reference for the full set of request parameters.
Versa uses the customer handles you provide to determine if the receipt should be sent, and if so, where. Customers must explicitly authorize 'receivers' (e.g. the expense management app they use) to receive their receipts (see the Receiving docs for details). When you complete a sale, you check if there are any matching authorized receivers. The receipt is only sent in the case that there is a positive match.
For test sending, you can provide 'sandbox-firehose.versa.org' as the customer_email_domain handle, or provide a full customer_email with any username, e.g. 'jshmoe@sandbox-firehose.versa.org'. For the receipt, any valid Versa receipt will do; you can copy an example receipt from the Versa Schema documentation. Read the testing section below for more details.
Congratulations! You’ve sent your first receipt. 💥
Self-Hosted Configuration
The fastest way to get started with a self-hosted sender client is to use the official Versa Docker image. This image includes a simple sender client that you can run on your own infrastructure. You’ll need to provide your CLIENT_ID and CLIENT_SECRET as environment variables. You’ll still need to do the work of mapping your schema to ours before posting receipts to the service, but the Dockerized service will automatically handle all the remaining steps (see below). Or, if you prefer, you can implement a client from scratch in your language of choice, as outlined in the Sender Implementation Guide.
There are three steps:
TIP
If you already have an active client that you’ve been using in a custodial configuration, you can continue to use those same keys in a self-hosted configuration. Or create a new sending client.
1. Register the Transaction
Upon completing a sale, you’ll want to register the transaction with Versa. You’ll pass up a customer handle (e.g. the customer’s work email address), and Versa will match that handle with any authorized receivers. If there are matched receivers, Versa will return the URL indicating where to post the receipt.
Versa supports four different handle types: customer_email, customer_email_domain, card_bin, card_last_four. You must send at least one handle, and you can include multiple. Versa will return matches for any of the handles independently, with the exception of card_last_four (as card_last_four is not unique).
curl --request POST \
  --url 'https://registry.versa.org/register' \
  --header 'Authorization: Basic CLIENT_ID:CLIENT_SECRET' \
  --header 'Content-Type: application/json' \
  --data '{
    "schema_version": "2.3.0",
    "handles": {
      "customer_email": "joe@acme.com"
    }
  }'
| Field | Type | Description |
|---|---|---|
schema_version | string | The schema version of the receipt that you will send. |
handles | object | The customer handles. |
Handles Object
| Field | Type | Description |
|---|---|---|
customer_email | nullable string | E.g. 'jshmoe@acme.com'. |
customer_email_domain | nullable string | E.g. 'acme.com'. |
merchant_group_code | nullable string | E.g. 'ACME_123'. |
NOTE
Versa also supports payment_account_reference (PAR) and merchant_user_code handles, but to enable these forms of matching, you’ll need to be opted in by the Versa support team.
(See the Visa, Mastercard, and AmEx documentation on using PAR.)
Example response:
{
  "mode": "prod",
  "encryption_key": "jZt54/mk2RjP4qtNekQQyamu4qoEaxCE/qk5fhi5LuQ=",
  "receipt_id": "rct_5ed073abbf3a4b49a8c03191f87d8ffe",
  "transaction_id": "txn_458a58b2dd7a4fe3a9ad3165a511ac2a",
  "receivers": [
    {
      "endpoint_url": "https://bank.com/receipt",
      "event_id": "evt_ee5a0782cb734f56a36ede1c087e00c1",
      "org_id": "org_39a0e09cf0a24b02ba92bf8c8369b319",
      "secret": "versa_rsk_d9362d18f76845afb4c75b8388d2e549"
    },
    {
      "endpoint_url": "https://expenseapp.com/receipt",
      "event_id": "evt_bb5a0782cb734a43226ede1c087e0b1f",
      "org_id": "org_df8d2ce28f6e48afb2dfe4af0c57788f",
      "secret": "versa_rsk_56781edd14ba47a4938e252b0c3932ee"
    }
  ]
}
| Field | Type | Description |
|---|---|---|
mode | enum | One of test or prod. |
encryption_key | string | The key you’ll use to encrypt your receipt. |
receipt_id | string | The id of the specific receipt being sent. |
transaction_id | string | The parent of the receipt — used for updating receipts. |
receivers | array | A list of receiver objects. |
Receiver Object
| Field | Type | Description |
|---|---|---|
address | string | The URL where you’ll post the encrypted receipt. |
client_id | string | The id of the receiving client. |
org_id | string | The id of the receiving org (orgs can have multiple clients). |
secret | string | Used for HMAC verification. |
If there are no authorized receivers for the given handles, Versa will return an empty array, and the process ends.
2. Encrypt the Receipt
Receipts are encrypted with the AES-GCM-SIV 256 bit encryption algorithm, using the registry-provided key and a unique nonce generated for each receiver.
For a language-specific example client implementations, see the Sending Client Implementation doc.
3. Send the Receipt
For each receiver, generate an HMAC verification token using the supplied webhook secret.
Wrap the data in a webhook "receipt" event, including the registry-provided event_id.
The nonce and encrypted data are then sent to the receiver’s address (a webhook endpoint),
at which the receiver will check out the key from the registry and decrypt the envelope.
curl --request POST \
  --url 'https://expenseapp.com/receipt' \
  --header 'X-Request-Signature: <HMAC_TOKEN>' \
  --header 'Content-Type: application/json' \
  --data '{
    "event": "receipt",
    "event_id": "evt_ee5a0782cb734f56a36ede1c087e00c1",
    "data": {
      "sender_client_id": "versa_cid_3633863a5e5d417eb723124b387ec929",
      "receipt_id": "rct_5ed073abbf3a4b49a8c03191f87d8ffe",
      "envelope": {
        "encrypted": "ozAUXJFhNlJTlfTAi33J4K55HxonNg2CnbAIbUBornUbsS3WG+AAhdbhdFgyB/WmPXTNgFNDRX5CfAqhAnJoDITBN56rncpv",
        "nonce": "okYVc6b9GOeGsaMe"
      }
    }
  }'
| Field | Type | Description |
|---|---|---|
sender_client_id | string | Your sender client id. |
receipt_id | string | The id of the receipt, taken from the registry response. |
envelope | string | The container for the encrypted receipt and nonce. |
Updating a Receipt
You may, on occasion, want to update a receipt e.g. to include a tip or refund. Updating a receipt is nearly identical to sending a new receipt. The only difference is that the original transaction_id returned by the registry is now included in the 'update' registration request.
For example:
curl --request POST \
  --url 'https://registry.versa.org/register' \
  --header 'Authorization: Basic CLIENT_ID:CLIENT_SECRET' \
  --header 'Content-Type: application/json' \
  --data '{
    "event_type": "receipt",
    "handles": {
      "customer_email": "joe@acme.com"
    },
    "schema_version": "2.3.0",
    "transaction_id": "txn_458a58b2dd7a4fe3a9ad3165a511ac2a"
  }'
This will associate the new receipt record with the original receipt.
Canceling a Transaction
To update a receipt or booking as canceled, an update event should be sent with an empty itemization.
Registering Customers
In certain cases, senders may wish to proactively push their receipts to specific receivers. See the Customer Registration overview and the section on sender registration for details.
Testing Your Integration
You can test that your receipts are valid, according to the Versa JSON Versa Schema, using the Studio.
Once you’re ready to send receipts, you can test your configuration by using test client credentials and our Sandbox Firehose Receiver. The Sandbox Firehose Receiver only accepts receipts sent via a test client, and exposes those receipts to any authorized user via the Sandbox Firehose.
WARNING
Please be aware that the Sandbox Firehose page is accessible to anyone with a Versa account. Do not send production or sensitive data to the sandbox.
To send a test receipt to the sandbox, use the email domain 'sandbox-firehose.versa.org' as your customer handle.
For example, with a fully implemented self-hosted client:
curl --request POST \
  --url 'https://registry.versa.org/register' \
  --header 'Authorization: Basic CLIENT_ID:CLIENT_SECRET' \
  --header 'Content-Type: application/json' \
  --data '{
    "event_type": "receipt",
    "handles": {
      "customer_email_domain": "sandbox-firehose.versa.org"
    },
    "schema_version": "2.3.0"
  }'
...or if you are starting with a custodial sender:
curl --request POST \
  --url 'https://custodial.versa.org/events' \
  --header 'Authorization: Basic CLIENT_ID:CLIENT_SECRET' \
  --header 'Content-Type: application/json' \
  --data '{
    "handles": {
      "customer_email_domain": "sandbox-firehose.versa.org"
    },
    "data": { ... }
  }'
After registering your test receipt (and sending the encrypted payload to the matched receiver), you can view the receipt on the Sandbox Firehose page for up to 3 days. After 3 days, receipts are purged from the firehose.